MAKING MY 1ST BALL JOINT DOLL PART 14 – Finished

Ball Joint Doll, Custom Dolls

This is a super exciting post because my 1st ball jointed doll made totally from scratch is finished and it feels amazing to look at him!! I will definitely be making more dolls in the future and no matter how much I progress this doll will always be precious to me.

Introducing my 1st Ball Jointed Doll Simon.

MAKING MY 1ST BALL JOINT DOLL PART 12

Ball Joint Doll, Custom Dolls

This is a really exciting post for me because it’s the 1st time I’m seeing my doll strung together standing and posing. To string the doll you need 3 pieces of elastic. For SD size ball jointed dolls 3mm elastic is recommended. For the legs cut 2 pieces approximately double the length of the distance from the neck to the knee and for the arms cut one piece that is double the length from one elbow across the chest to the other elbow. You can play around with this if you want your doll strung more tightly or loosely. There are some good videos on YouTube that can help with stringing. The important thing is keeping the left and right parts labeled so nothing gets mixed up.

It’s a great feeling seeing all the parts come together and seeing your doll stand and sit. I had to make some adjustments to the knees but he was able to stand on his own though I prefer to have him on a stand for safety. I was able to get him to sit in a lot of different positions which was awesome. Next I’ll be taking the doll apart again to paint it.

MAKING MY 1ST BALL JOINT DOLL PART 11

Ball Joint Doll, Custom Dolls

In this brief post I’ll be talking about the arm joints. It’s very similar to the leg joints. I used a double joint for the elbow to give more movement. I carved and sanded the sockets to fit the joints. You can see there is an angle where the upper and lower arm meet when they bend. This allows it to bend further. It takes time and patience to get the fit just right and don’t be afraid to make a mistake because you can always add clay and start again.

MAKING MY 1ST BALL JOINT DOLL PART 10

Ball Joint Doll, Custom Dolls

Working on the leg joints in this post. Now that I have the hollow balls I carved out the top of the the upper leg enough to sit the ball into it and then I cut a hole into the half of the ball that will sit into the leg to allow for the elastic to go through. On the top half of the ball you will cut a slit for the elastic to move along as the leg bends up and down. You secure the ball using slip and additional clay. Once it is dry you can sand it to a nice round shape.

I made a double joint for the knee to give it more mobility so it is a separate piece that fits into the upper and lower leg. For more information on the double joint go to Everyday Art by Kathy O’Connell. At the bottom is the foot which has a hook that secures to the elastic and completes the leg. Once I had all the pieces finished I strung the legs with elastic to test the joints.

MAKING MY 1ST BALL JOINT DOLL PART 9

Ball Joint Doll, Custom Dolls

Continuing to work on the balls for the joints. I used a pencil to draw a line around the center of the ball, it doesn’t have to be perfect. Then I drew a  small reference line to make it easier to join the halves back together. Then I cut open each ball with an Exacto knife and removed the cores to hollow them out.

Using slip (which you make by taking any shavings or sanding dust from your sculpture and putting it in a jar with a little water that you leave until it softens and becomes the consistence of paste) I jointed the halves of the balls back together. It’s okay if the balls are not perfectly round since half of the ball is going to go into the leg or arm joint that you are working on. Once you secure the ball in place you only have to smooth out the half that fits into the socket.

Lastly for the day I sanded the ears on the head. Next will be getting the leg joints to work.

MAKING MY 1ST BALL JOINT DOLL PART 8

Ball Joint Doll, Custom Dolls

At this stage I am replacing the head cap and sealing it in place since I won’t be changing out the eyes. If you purchase a resin ball jointed doll from a company they make the head cap removable to change the eyes. I smoothed out the head and added a rough version of the ears. Once they dry I will sand them and refine the shape.

Next I started working on the balls for the joints. I took wooden balls and beads smaller then the size I want and then wrapped them in clay and smoothed it as round as possible in my hand. You can see a break down of the process at Everyday Art by Kathy O’Connell.

Finally for the day I cut the arms at the mid-point for the elbow joint.

MAKING MY 1ST BALL JOINT DOLL PART 7

Ball Joint Doll, Custom Dolls

Working on the face and arms in this post. I refined the very rough details that I started with making adjustments as I went. Working with air dry stone clay requires adding and taking away to get just the right look. It also requires a lot of sanding. After refining the features I formed the socket for the neck joint and added the eyes. I began working on the arms of the doll using smaller paper straws for the core. Once they were dry the paper straws slipped right out. You will see the line I drew to know where to cut for the elbow joint.I also worked to sand and smooth out the torso.

MAKING MY 1ST BALL JOINT DOLL PART 6

Ball Joint Doll, Custom Dolls

In this part I worked on hands, feet and lower torso. I sculpted some feet out of Sculpey to practice making feet but I liked the way they came out and I also liked the extra weight of the Sculpey to give the doll more stability so I decided to use them instead of making new feet from the air dry clay. With the success of the feet I figured why not use Sculpey for the hands as well since I’m more familiar with that clay and it was easier to do the fine details.

Next I joined together the halves of the upper and lower torso. I used Apoxie Sculpt to join the halves together because I wanted the bond to be strong but in the future I think I am going to just score the area (making small cut marks with an Exacto knife) and join the halve with clay. Apoxie sculpt is easy to work with but its harder to sand and carve which is something that you do a lot of.

2016-06-30 08.08.38

With the top half of the torso I just sanded the along the bottom to smooth it out and refine the curved shape. The bottom half of the torso takes a lot more work. The cut I made was not the neatest but it really doesn’t matter because I’m to build up the form into a oval shape that will fit into the bottom of the top half. This allows the the body to bend forward and back more naturally. I also used wooden balls to start carving out the shape for the leg sockets. Next I will be refining the torso and working on the face.

MAKING MY 1ST BALL JOINT DOLL PART 5

Ball Joint Doll, Custom Dolls

So this is part 5 of making my doll. In this part I used my Exacto knife to cut the torso into 2 sections to allow for better movement of the doll and I began to add some very rough features to the head.

In the next post I will continue working on the head, torso and legs. I will also work on the hands and feet.

MAKING MY 1ST BALL JOINT DOLL PART 4

Ball Joint Doll, Custom Dolls

So this is part 4 of my doll making process. In this post I will go over cutting open the head and torso. For anyone that might not know about ball jointed dolls the head, torso, arms and legs are hollow to allow for the stringing of elastic through the doll.

First I used my Dremel  hand drill to cut open the top of the head. Place a mark on the skull to make it easier to fit the two pieces back together. You don’t have to worry about being too neat as you will be putting the pieces back together. Once the top was removed I gently pushed the inside form away from the walls of the head until I could pull it out. I was left with a pretty consistent depth of clay around the form. At this point I carved out the initial shape of the eyes.

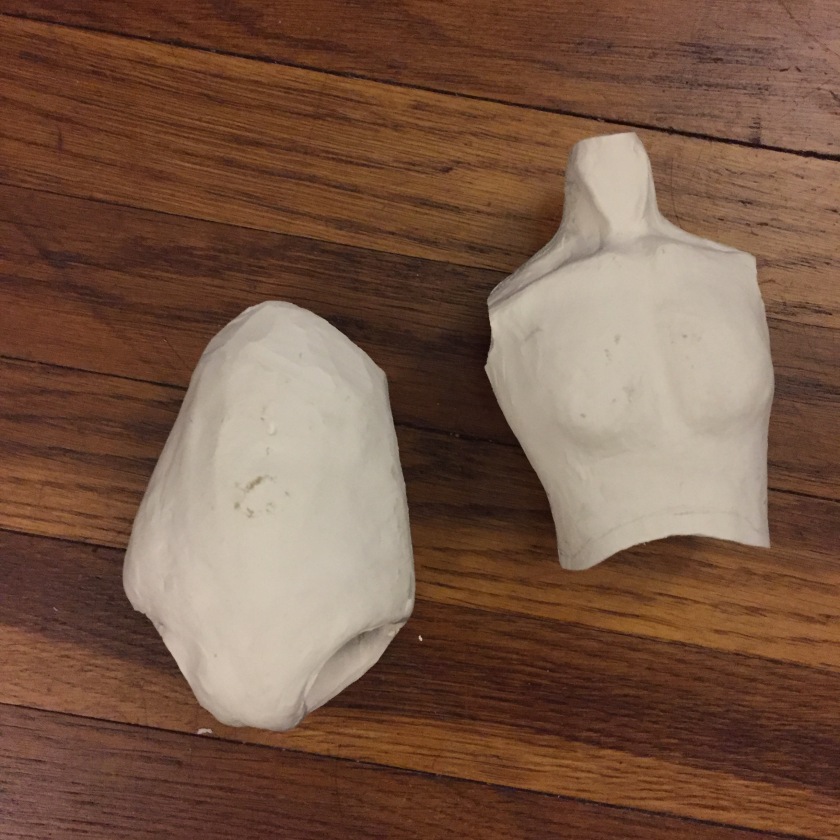
My next step is to hollow out the torso. I used my Dremel again to cut along the sides, shoulder, neck and bottom of torso. I finished off using my Exacto knife to separate any areas that I missed with the drill. Gently I pulled the two halves apart and removed the inner core. I was happy to find that it came apart fairly easily. In the next post I will cut the torso in half to give the doll more movement and I will add features to the face.